Render Settings
The render settings include a lot of parameters to globally control your render.
Samples
The maximum number of rays to be shot per pixel.
Adaptive Threshold
The noise threshold below which the renderer stops sampling a pixel.
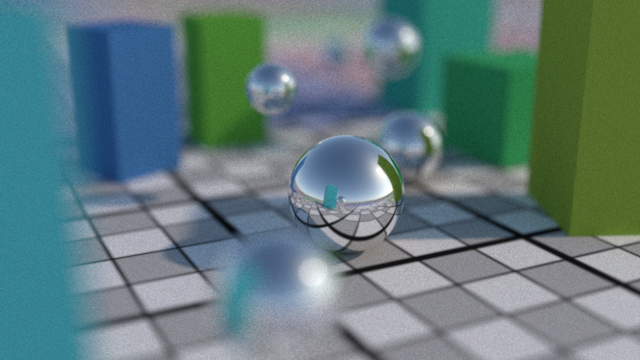
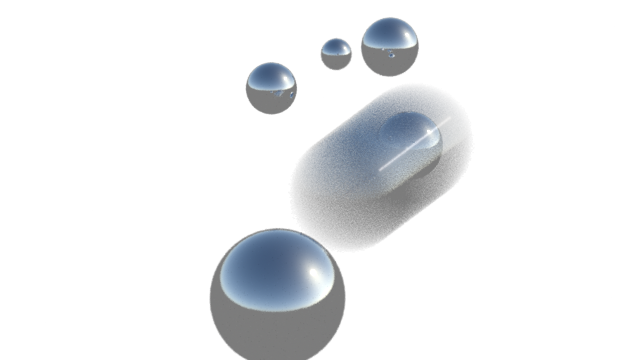
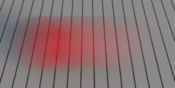
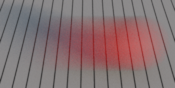
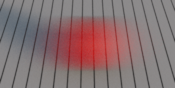
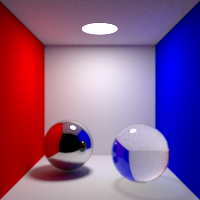
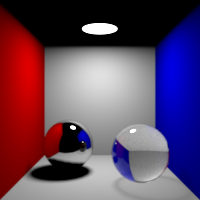
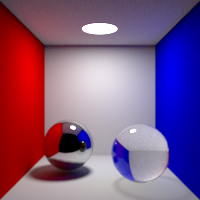
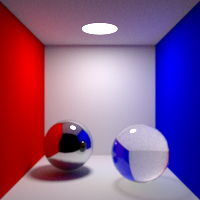
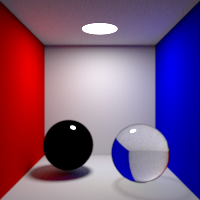
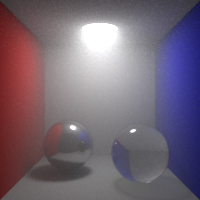
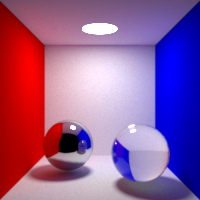
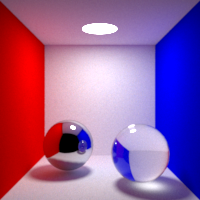
The Adaptive Threshold controls the final pixel noise quantity. Using Adaptive Sampling allows the renderer to shoot more samples where the noise is higher, while shooting less samples where the noise is lower. Compared to non adaptive sampling, this usually results in a uniform noise quality over the image, and much faster renders for a given quality threshold.

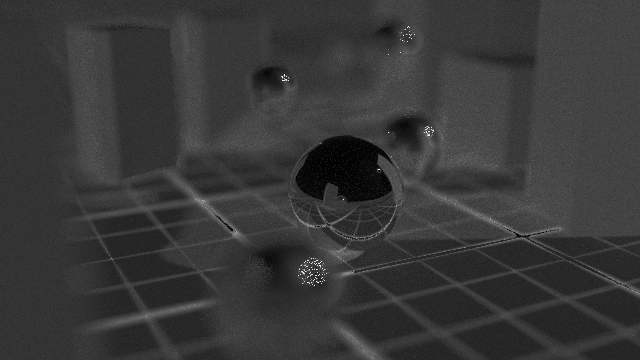
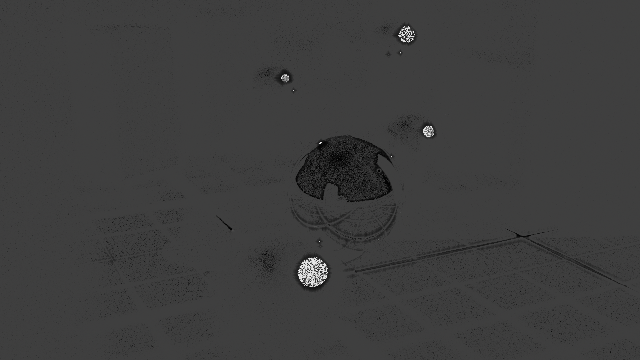
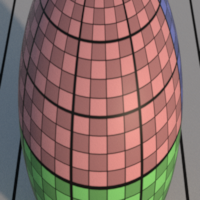
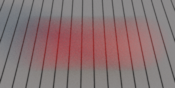
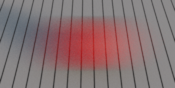
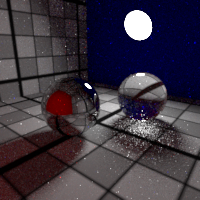
The Confidence AOV shows the noise quantities for both renders (darker areas have less noise, brighter areas have more noise.)
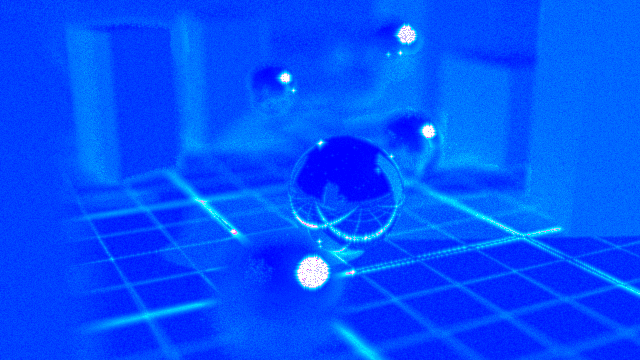
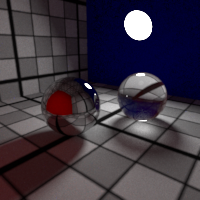
The Heat AOV indicates the number of samples shot per pixel (blue pixels have lower samples, white pixels have the maximum number of samples.)
Adaptive Min Samples
The minimum number of rays to shoot per pixel.
This value controls the minimum number of rays to shot per pixel before the adaptive sampling is evaluated. In some cases, like in very occluded parts of the scene or on caustics, the adaptive sampling can miss some features of the image, and it can be necessary to increase this in order for the sampler to see these features. Rendering in adaptive with buckets and high threshold may exhibit this issue, and you should increase the minimum number of samples.

Sampling Mode
Switch between progressive and bucketed rendering modes.
- "Progressive" renders the full image iteratively, enabling a quick preview of the whole image, and progressively refining up to the final quality.
- "Bucket" renders the image by buckets. Each bucket is sampled up to the final quality until another bucket is rendered.
Note that rendering deep images requires switching to the Bucket mode.
Path Guiding
Toggle path guiding rendering mode. "Path Guiding" renders the full image iteratively in several passes, where each pass uses info gathered during the previous pass about incident light direction. On difficult scenes, after a few passes, image can converge significantly faster than with unguided sampling.
Size
Use Project Settings
Connects the image settings to the project settings, see
Width
Width of the image, in pixels.
Height
Height of the image, in pixels.
Aspect Ratio
Aspect ratio of the image.


File
Write Images
Writes the images of the pass during a local render (CTRL+R or "Local" render). During a batch or a farm render, the images are always written.
File Pattern
Pattern used to create the name of the output file. The pattern can contain $# items which are replaced by the following:
- $l is the RenderPass path (including prefix and hierarchy)
- $L is the RenderPass name (excluding prefix and hierarchy)
- $n is the RenderLayer name
- $o is the Output name
- $e is the eye number (1 for the leftmost)
- $E is the eye name (as 'left' and 'right')
- $c is the camera name including prefix
- $C is the camera name excluding prefix
- $x is the default display extension (exr, tiff, etc.)
- $f is the frame number ($03f is frame number 0-padded to 3 digits)
File
Preview of the final filename in wip mode, for the first output, frame 666 and the eye #1.
Layer Pattern
Pattern used to create the name of the layer inside the file, when supported.
When rendering in exr files or supported formats with layering, this value is used to control the name
of the produced layers. You can use specifiers like $f, $e, $x, etc, like in $l_$n_$o. The default value is $n_$o.
File Format
The file format of the output image.
- Tiff : write a tiff file. This format support 8 bits and float pixels. It applies a gzip like lossless compression.
- Targa : write a Truevision TGA file. This format support the 8 bits pixels. It is not compressed.
- Png : write a Portable Network Graphcis PNG image. This format support the 8 bits pixels. It applies a gzip like lossless compression.
- OpenEXR : write an OpenEXR file. This format supports the half float and float pixels, layers and deep images. It includes various compression schemes.
- OpenEXR/Id : write an OpenEXR/Id file. This format supports the half float pixels. A dedicated reader is needed to read the image in the compositing software. Using this format, one can isolate any object in the image.
Use LPEs
Write a deep OpenEXR/Id with LPEs (light path expressions)
Write Deep Image
Write a deep image. A deep image contains multiple pixel colors in depth. Only for the OpenEXR format.
Those images can be very large if not carefully compressed.
Deep Image Compression Ratio
Controls the lossy compression of the deep pixels. 0 means no compression, 1 means maximum compression. In all cases, the result of the flatten image is lossless. Only for the OpenEXR format in Deep Image mode.
Deep Image Merge Flag
Allow to merge the fragments from different objects in the same deep fragment.
Multi Part
If checked, writes the AOVs as OpenEXR 2.0 multi-part files. If not checked, writes the AOVs as channels (compatible with OpenEXR 1.0). Only for the OpenEXR format.
Meta Data
The meta data to insert in the EXR file header. You can add a metadata per line. Here is an exemple of two meta data :
key1=value1
key2=value2
Pixel Format
Pixel format of the image.
- RGBA : the red, green, blue and alpha channels are written in the file.
- RGB : the red, green, blue channels are written in the file.
- A : the alpha channel is written in the file.
Depth
Bit depth of the image.
- 8 bits : the color components are quantized on 256 values. This produces the smallest files, with the smallest color precision. The color values are clamped between [0.0, 1.0]. 8 bits colors should be written using a sRGB gamma.
- Half float : the components are stored in a half float (16 bits) which is a good choice for the color channels. No clamping. Only for the OpenEXR format. This mode is not precise enough for texture coordinates (st), positions (P) and depth (Z) AOVs, choose Float for those.
- Float : the components are stored in a float (32 bits) which is the highest quality you can get. No clamping. Only for the OpenEXR and Tiff formats.
Compression method
The OpenEXR compression algorithm.
- None: no compression.
- RLE: run length encoding.
- Zips Lines: zlib compression, one scan line at a time.
- Zips Blocks: zlib compression, in blocks of 16 scan lines. The default compression method.
- Piz: piz-based wavelet compression.
- PXR24: lossy 24-bit float compression.
- B44: lossy 4-by-4 pixel block compression, fixed compression rate.
- B44A: lossy 4-by-4 pixel block compression, flat fields are compressed more.
- DWAA: lossy DWA A compression method.
- DWAB: lossy DWA B compression method.
DWA Compression
Higher values provide more compression of the final image file, but reduce the quality. Only for EXR DWAA and DWAB compresion methods.
OpenEXRId Pattern
This attribute set the naming scheme of objects in the OpenEXRId file, using tokens such as $(PATH) and $(TAGS).
File Alpha Mode
Indicate if the colors are written multiplied by the opacity in the file.
In all cases, the alpha channel is written with the opacity left untouched.
- Unpremult/Unassociated Alpha : Write color independently of the opacity.
- Premult/Associated Alpha : Write color with the opacity multiplied.
Gamma
Indicate the LUT to apply to the output image.
The default value uses the project's gamma. For 8 bits images, you may want to use a
Backup Project File Name
The name of the backup gproject file to be saved along rendered images.
When rendering images in batch or farm, Guerilla can save a file along with each active Layer.
This option is useful if you want to keep a track of the setup that is the source of the rendered
image. This value accepts $l and $n specifiers. When left empty, no file is saved.
Image Sampling
Time Jitter
If checked, change the jitter pattern at every frame.
Motion Blur
Globally enable or disable the motion blur. This flag completely enables/disables the rendering of motion blur. Note that disabling motion blur also disables motion vectors. To disable motion blur but keep the motion vectors information, use the Instantaneous motion blur density instead.
Motion Blur Density
Change the shape of the motion blur.
The Instantaneous density samples the time at a single
instant between the shutter opening and closing. You can change
this time using the
The Trapeze density samples the time using a parametric
trapezoidal density, using
To disable motion blur, you should consider using the Instantaneous density, as this preserves useful information such as motion vectors through the whole rendering pipeline.
Motion Blur Trails
The motion blur trail density, 0 for smooth trails, 1 for sharp trails.
Motion Blur Time
The instant time in the frame for Instantaneous distribution (0 for shutter open, 1 for shutter close.)
Motion Blur Width
For Trapeze density, the width of the fully opened shutter plateau
Motion Blur Width
For Parametric density, the width of the fully opened shutter plateau
Motion Blur Skew
For Parametric density, skews the distribution trapeze toward shutter open (0) or towards shutter close (1)
Motion Blur Shape
For Parametric density, change the density trails shape, from smooth (0) to sharp (1)
Depth of Field
Enables simulating the depth of field lens effect.
Bokeh Bitmap
Specifies the bokeh luminance bitmap used to control the bokeh distribution.
Bokeh Sides
Specifies the number of sides of the parametric bokeh. Values below 3 use a simple round bokeh.
Bokeh Angle
Specifies the tilting of the parametric bokeh.
Bokeh Inner Density
Specifies the density of the parametric bokeh at the center.
Bokeh Outer Density
Specifies the density of the parametric bokeh at the edge.
Bokeh Roundness
Specifies the roundness of the parametric bokeh, positive values for a round bokeh, 0 for polygonal and negative for a pointy bokeh.
Pixel Filter
Filter
The filter to use to reconstruct the final image.

Note that rendering deep images requires a FIS filter mode, such as Triangle FIS.
X Width
Width of the filter, in pixels. 1 is the ideal size regardless the filter type. A value larger than 1 will blur the image, a value smaller than 1 will produce a sharper image.
Y Width
Height of the filter, in pixels. 1 is the ideal size regardless the filter type. A value larger than 1 will blur the image, a value smaller than 1 will produce a sharper image.
Path Throughput Clamp
Clamp the light path samples values.
Clamp Pre Filter
Clamp the sample values. Try [0,10] or [0,5] to remove fireflies. If both values are equal, no clamping is done.
Clamp Post Filter
Clamp the pixel values. If you want to output positions, normals or any other non ranged values, you should reduce the min value to a negative value (like -10000). Set range minimum to 0 to avoid negative values in colors, due to ringing filters, for instance.
Mitchell Parameters
Mitchell filter B and C parameters.
Shading
Max Bounces
Global maximum raytracing depth. This value clamps the value contained in raytracing nodes.

Light Max
Maximum depth for light
This value controls the photon tracing depth globally. Set to 0 to disable bidirectional path tracing. Increase this above 0 to turn on bidirectional path tracing.
Diffuse Bounces
Maximum number of diffuse bounces. This value can be individually overriden in the shader properties.
Specular Bounces
Maximum number of specular bounces. This value can be individually overriden in the shader properties.


Refraction Bounces
Maximum number of refraction bounces. This value can be individually overriden in the shader properties.

Volume Bounces
Maximum number of bounces in volumes. This value can be individually overriden in the shader properties.

Shading Blurriness
Control the shading blurriness, in pixel area.
Smaller values mean finer texture lookups but greater memory usage.
Russian Roulette
Control the russian roulette cutoff.
The russian roulette randomly stops the light path propagation, based on the surface reflectivity or transmitivity. This reduces the average light path length, resulting in lower rendering time for the sample amount of samples per pixel, but usually increases the noise.

While enabling the russian roulette usually requires more samples, this generally proves a good trade off in render time, especially when you increase the bounces limits.

Higher albedos are less affected by the russian roulette, and surfaces with albedo equal or greater than 1 (e.g. pure red or white ...) disable the russian roulette.
Light Color
General light color This parameter adjusts globally all lights (and emission) color.
Light Intensity
General light intensity This parameter adjusts globally all lights (and emission) intensity.
Light Exponent
General light exponent This parameter adjusts globally all lights (and emission) exponent.
Light Cut-Off
Minimum amount of light to be accumulated from lights Below this threshold light is cut off. This option prevents too small values from being traced and accumulated, and reduces the number of shadow rays. Increasing this value too much will remove visible light.
Light Sampling Mode
Light sampling algorithm. ADD DOC HERE.
Spectral
Enable spectral rendering
Using spectral rendering allows rendering more accurately certain effects such as dispersive refractions.

Note that spectral rendering is not enabled by default on all shaders
and most notably,
Adaptive Luma Threshold
Controls the low luma threshold below which the adaptive stops sampling
Caustic Blur
Controls the caustic paths blurring
Higher caustic blur results in less noisy images, but can alter the shape and intensity of caustics, while lower caustic blur results in more acurrate caustics, at the cost of noise and fireflies.

Caustics Type
Controls which light paths are to be considered caustics
Caustic Buffer
Enable the caustic buffer. Rendering caustics using bidirectional path tracing requires caustics generated by light paths to be stored separately in a distinct image buffer. Enable this to benefit from light paths caustics.
Stereoscopy
Stereo Viewpoints
One Pass Stereo
Enables stereoscopic viewpoints to be rendered in one single pass. If checked, allows to render all viewpoints in one single pass. If unchecked, forces to render all viewpoints separately.
Force Eye
Force the rendering of a single eye.
Denoising
Denoiser
The denoiser to use. If "None", no denoising. "Default" is an internal experimental denoiser.
Altus Command Line.
The command line used to run the altus denoiser.
Altus Only Files.
Save the file images for Altus but don't run the altus denoising.
Denoiser
The denoiser to use. If "None", no denoising. "Default" is an internal experimental denoiser.
Histogram bin count.
Histogram patch distance threshold.
Histogram Gamma.
Histogram maximum.
Radius of search windows.
Radius of patches.
Random pixel order.
True for random pixel order (in case of grid artifacts) (default: False).
Spike removal prefiltering.
True for a spike removal prefiltering (default: False).
Spikes threshold factor.
Probability of skipping marked centers of denoised patches.
Number of scales for multi-scaling.
Minimum eigen value for matrix inversion
Denoiser
The denoiser to use. If "None", no denoising. "Default" is an internal experimental denoiser.
Batch
Force Render Split Layers
When enabled, force the rendering layers separately.
Generate Preview After
Generate a snapshot rendering after n minutes. Set this to 0 to disable the preview.
Stop After Preview
Stop after the preview snapshot is saved. Restarting rendering will resume from this checkpoint.
Extended Max Samples
Maximum number of samples to reach after the first rendering stage is reached.
Extended Adaptive Threshold
Minumum adaptive threshold to reach after the first rendering stage is reached.
Checkpoint Period
Generate a checkpoint rendering every n minutes. If the rendering process was stopped, restarting will resume from this checkpoint. Set this to 0 to disable Checkpoints.
Checkpoint Location
The directory to store intermediate checkpoint data.
Checkpoint Compression
The compression algorithm. Note tha pxr24 compresses much better but is slightly lossy.
Performances
Bucket Size X
Width of a rendering bucket, in pixels. Decreasing this value can save some memory during the rendering, but will increase the render time.
Bucket Size Y
Height of a rendering bucket, in pixels. Decreasing this value can save some memory during the rendering, but will increase the render time.
Bucket Order
Changes bucket rendering order.
Adaptive Locality
if 1, a pixel must have as many sample as its neighbor, so no adaptive. 0.5 means at least half of its neighbor, more adaptive, but less continuity in the number of samples. 0 means no continuity at all.
Opacity Threshold
Amount of accumulated opacity to be considered fully opaque. Decreasing this value reduces memory consumption and rendering time for scenes with large number of semi-transparent objects, such as hair or volumes.
Max Opacity Depth
Maximum number of accumulated hits through a ray with opacity. This value controls the maximum number of semi-transparent layers the raytracer will accumulate. Above this count, the ray is considered culled. Increasing this value may resolve early depth culling at the cost of rendering time.
Ray Batch Size
Maximum number of rays to be shaded simultaneously.
Max Active Buckets
Controls the maximum number of active buckets per rendering thread in Bucket rendering mode. Increasing this value can improve performances when the buckets have few pixels that are hard to sample, especially in Progressive mode. Increasing this value also consumes more memory, especially when rendering deep images.
Thread Texture Count
Number of texture tiles held by rendering thread. This value controls how many texture tiles are kept in active memory by each thread. Higher values mean faster rendering, but higher memory usage. Note that actual texture memory is not duplicated across threads, but rather forced to stay resident in memory instead of being flushed.
Texture Diff Control
Controls the texture differentials interpretation. Legacy uses sharp texture lookups, while Parametric uses smoother texture lookups, with control from Texture Diff Max Anisotropy.
Texture Diff Aniso
Controls the texture differentials maximum ratio between ds and dt. Smaller values produce sharper textures, but require more memory, while higher produce blurrier textures but consume less memory.
Multithread Prim Load
Enables multithreaded load and subdivision of primitives. Check this option to reduce loading time. Note that this can aggressively increase the peak memory usage. Uncheck this to prevent large memory usage.
Default Surface Color
Surface color to use when a primitive has no surface shader nor suface color.
Offset Id
Offset the sample id.
Light Strategy
Strategy for direct lighting Sample the light, the bsdf, both or both with MIS weighting
Use Default Settings
Force recommanded default settings
Max Vertices
Max vertices per path
Max Diffuse Vertices
Max diffuse vertices per camerapath
Max Specular Vertices
Max specular vertices per path
Max Refraction Vertices
Max refraction vertices per path
Max Volume Vertices
Max volume vertices per path
Light Diffuse
Default number of diffuse bounces.
Light Volume
Default number of volume bounces.
Render Display Runtime Stats
Time interval to display threads rendering stats, in seconds.